Redesigning a Karaoke Machine
So there I am in the thrift store, cash burning a hole in my pocket, looking for an excuse to break out my soldering iron. On the shelf is a CD+G karaoke machine with a cute little 5″ CRT. Now I don’t sing (yet), but a device like this speaks directly to me. I even managed to find a healthy stack of compatible karaoke CDs scattered through the store’s collection.
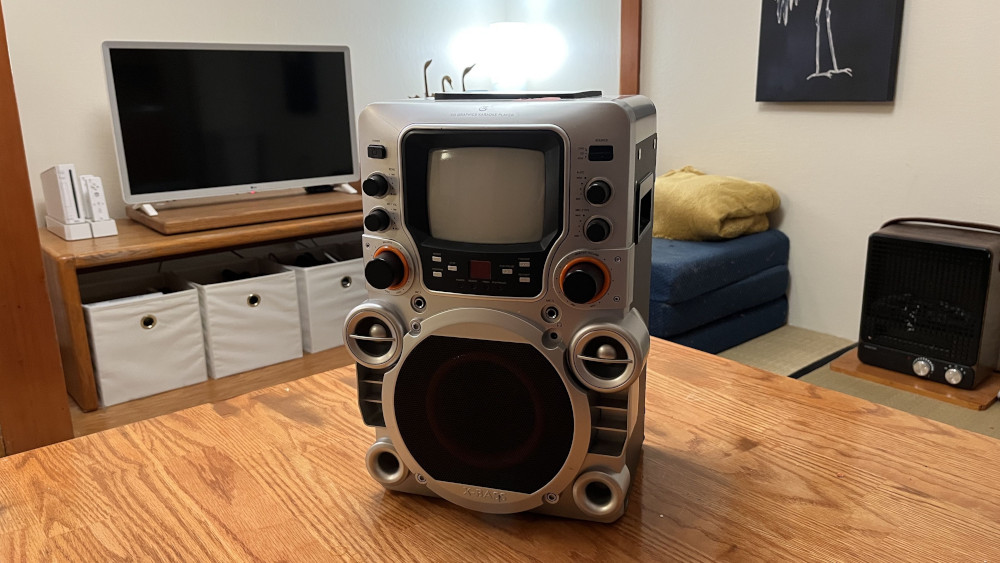
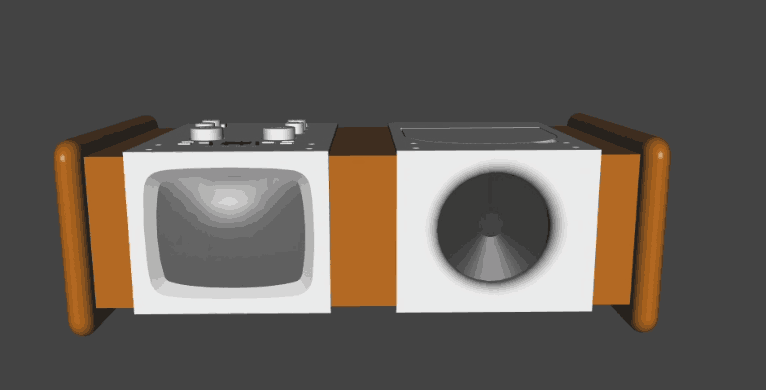
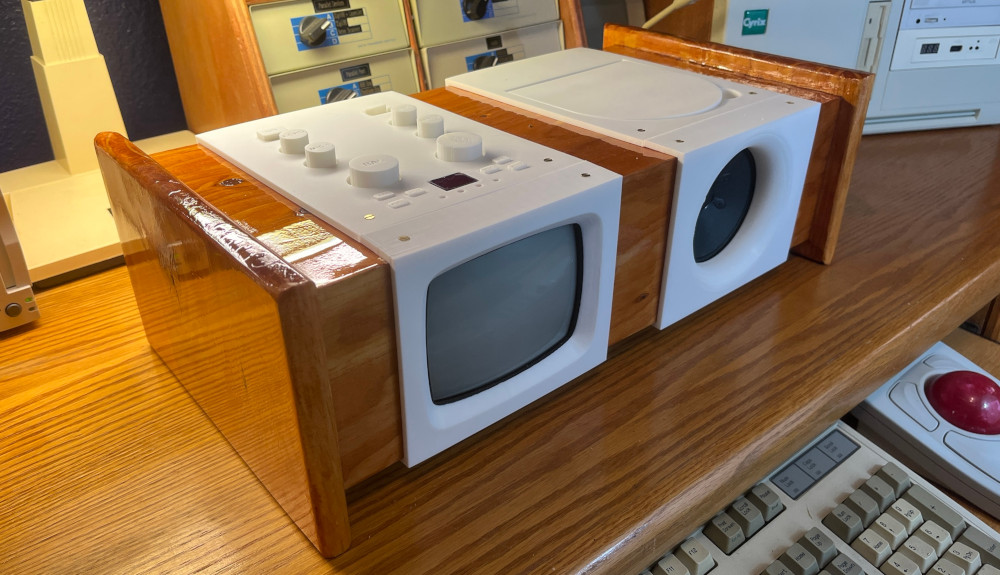
There were just two problems: The machine didn’t work, and its early 2000s 2 Fast 2 Furious faceplate was deeply offensive to my sensibilities. That field of fake tweeters, port tubes, and X-BASS lettering is backed by a single 4″ speaker you’d just as soon find in any clock radio.
Since I needed to fix the electronics, I figured I’d also fire up FreeCAD and fix the aesthetics.
And yes, this is my definition of “fixed.” It matches my 90s honey oak furniture. And I like 90s honey oak furniture because it’s ubiquitous and nobody wants it, so I can always get any matching furnishing I want for a crisp twenty.
Before we go into the process, though, a little history is in order. Beneath the overcompensating exterior is a genuinely interesting device, backed by an obscure CD format that was great for exactly one thing and hot garbage at everything else.
The CD+G format
According to Dr. Gough’s Techzone the CD+Graphics format allows an audio CD to also carry graphics data in the form of “video” delivered in normally unused subcodes of each audio frame. Essentially it takes leftover space within the CD-DA audio format and fills that with tiles of graphics. A regular CD player would still see and play the disc as a valid audio CD, but a special CD+G player could retrieve the additional data and use it to display a video. Poorly.
You see, the subcodes aren’t big. Dr. Herong Yang provides a helpful breakdown here of the layout of an audio frame. Each 588-bit frame carries 264 bits of “core data,” of which 192 bits are audio samples, 64 bits are error correction, and a mere 8 bits are for control and display. “Display,” as you can surmise, was not an original design goal of audio CDs. Two of those 8 bits are already reserved for audio navigation and timing, which leaves only 6 bits unused. A CD+G is a disc that has “video” in those 6 bits. There is 32 times as much audio data as video data in this format.
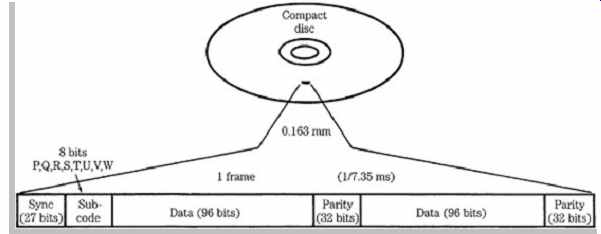
How to put this in real terms… At 75 sectors per second, 98 frames per sector, you’re looking at 7350 frames per second each containing 6 bits of video data, or about 5.5 kilobytes per second. That’s about equivalent to trying to watch Netflix on an AOL dialup connection. It’s really more of a slideshow.
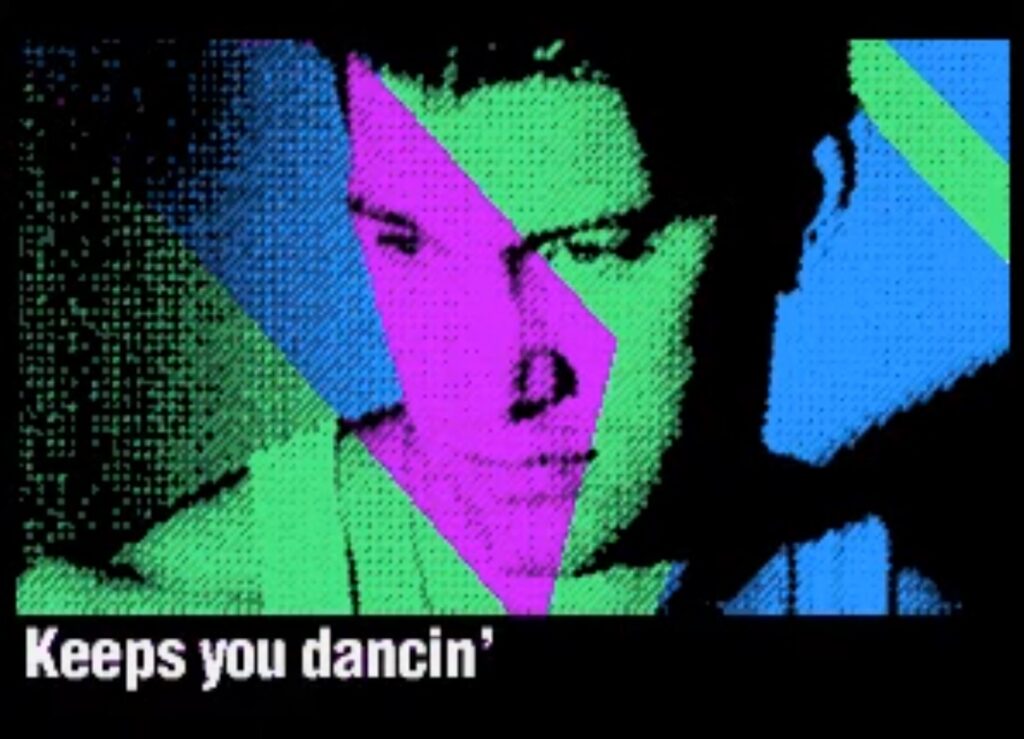
In practice, CD+G “video” looks like many little 16-color blocks updating as each new 24-byte graphics packet is assembled. A full screen refresh takes about 3 seconds, so most CD+G titles try to only update specific areas of the screen for motion, or do a randomized fill to swap out full-screen still imagery (much like a PowerPoint checkerboard transition). Chris Isaak’s “Dancin'” is one of the better examples I found of how this looked in practice:
Perfect for karaoke
CD+G never caught on for mainstream music releases. The CD+G Museum only lists 54 albums ever released in this format. Where it did see massive adoption was karaoke. The refresh rate may not be sufficient for full-screen visuals, but it’s plenty fast for writing a couple lines of text in time with music. And since it’s all graphics, that means there’s no character set inherent to the format. It’s just as good in any language.
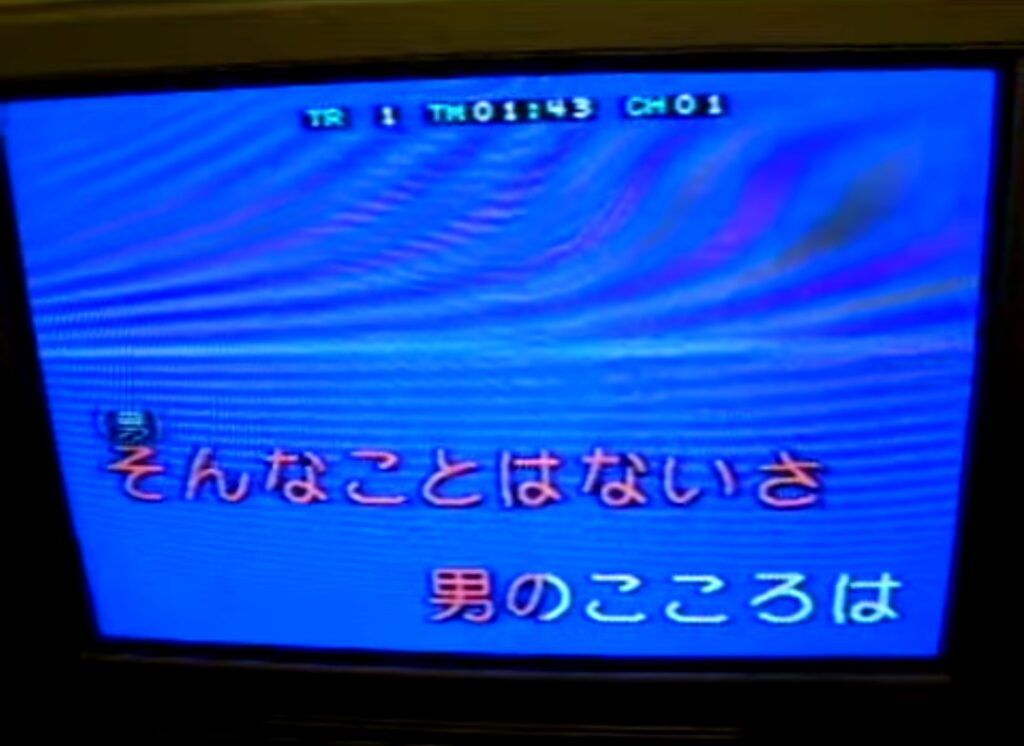
Something neat to think about is that the lyrics of a karaoke CD+G are baked right into the audio track in time with the song. It’s not a separate lyrics and timing file–the song’s words are right there in the audio frames as graphics, right as they’re meant to be sung.
While newer standards have now largely supplanted CD+G, you can still buy a brand new Pop Chart Picks 2025 album as of early 2026. That’s a physical media format with continuous commercial releases for 41 years so far, and I think that’s worth celebrating.
Restoring functionality
Technology of this era is starting to show its age more and more, and this karaoke machine was no exception. It seemed to more or less work when I plugged it in, but the microphone was very weak. Not fully dead, but just barely audible through the speaker even if you smacked it.
Nice thing is, it’s always capacitors. This must be some sort of universal law. If something is still in one piece but it doesn’t work, you can safely bet your evening that it’s a bad cap. And since capacitors only cost pennies and come in huge 500-piece kits, there’s rarely even a point in doing serious diagnostics.
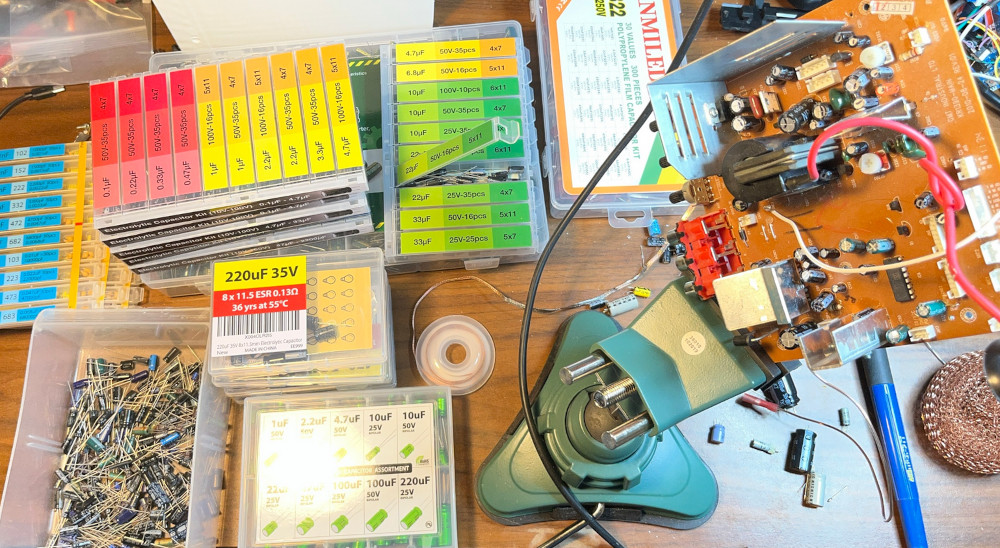
I believe in the automotive world this is called the “parts cannon” approach and is derided. With old electronics, though, why waste hours on an intelligent solution just to save a dime? With new capacitors it fired right up and worked exactly as expected.
If you’ve never tried soldering, I highly recommend it. As a hobby it doesn’t take up much space, and very capable iron like the KSGER T12 soldering station can be had for only $70 or so. YouTube has a wealth of tutorials, but simple rules like “reconnect the obviously broken wires” and “replace the capacitors” will honestly take care of about 90% of repairs, and it opens the door to a lot of hands-on learning about electronics.
One final note: Don’t open up an old device with a CRT until you’ve watched some videos on how to discharge them safely. And remember rule #2: double tap. Same goes for things with big capacitors like microwaves and power supplies. These devices do not have to be plugged in to kill you. That said, they’re nothing to be afraid of so long as you follow safe practices.
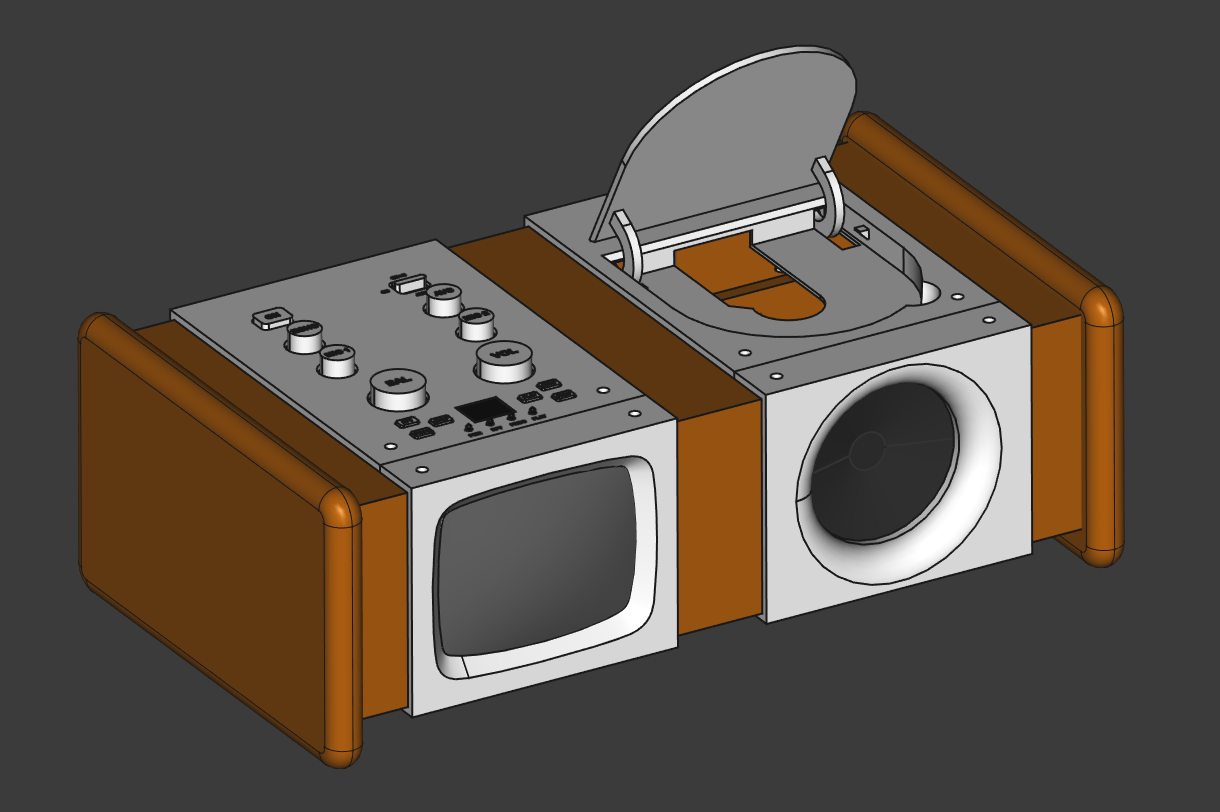
Designing a new case
My goals for the machine were to make it fit in with my furniture and, if possible, shrink it down a bit. About half the original design is just space wasted trying to look like it has more/bigger speakers. To this end, I opened up Paint and drew a rough idea of what I had in mind:
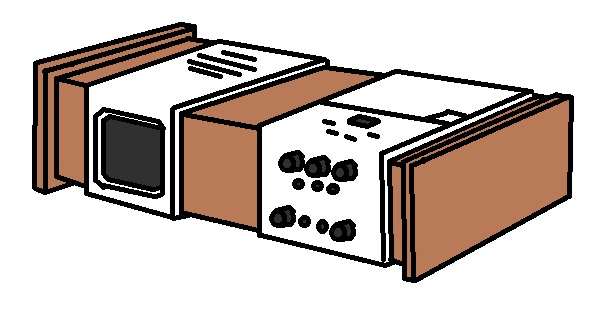
Then I opened up FreeCAD and drew the rest of the owl.
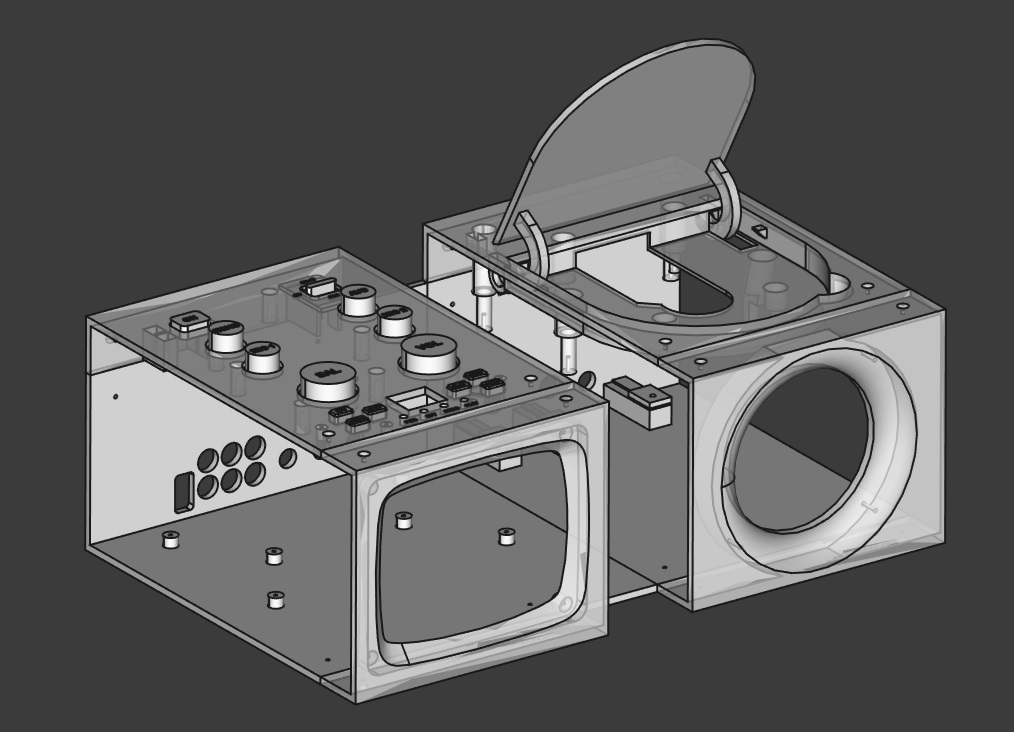
I realized soon after my Paint drawing that locating the speaker so close to the CRT’s beam deflector was probably a dumb idea, so that moved to the opposite side of the case. All in all, though, not a terribly hard process. Just extrude some basic sketches of the boards to be transplanted with their mounting holes accurately measured, line those up with some case pieces, and add some geometry to make them meet up with the holes. The only real trial-and-error bit was getting the curvature of the CRT bezel to match up properly to the tube since I’m not about to learn the math to measure and replicate that properly in CAD.
I have to thank id Software for everything I know about CAD. When I was a kid my favorite game was Quake and I spent countless hours designing levels in Quake Army Knife. Then what do you know, ten years later 3D printers came out and all the skills directly transferred–blockiness and all.
The TechDraw workbench
Using wooden components in a primarily 3D printed project is something I’ve never tried, so I got to explore a new workbench in FreeCAD this time. FreeCAD comes with all sorts of “workbenches” consisting of different toolsets you might want to use with your geometry. Turns out if you want a printable draft of an object in different perspectives that you can mark up with measurements, the TechDraw workbench makes that a cinch.
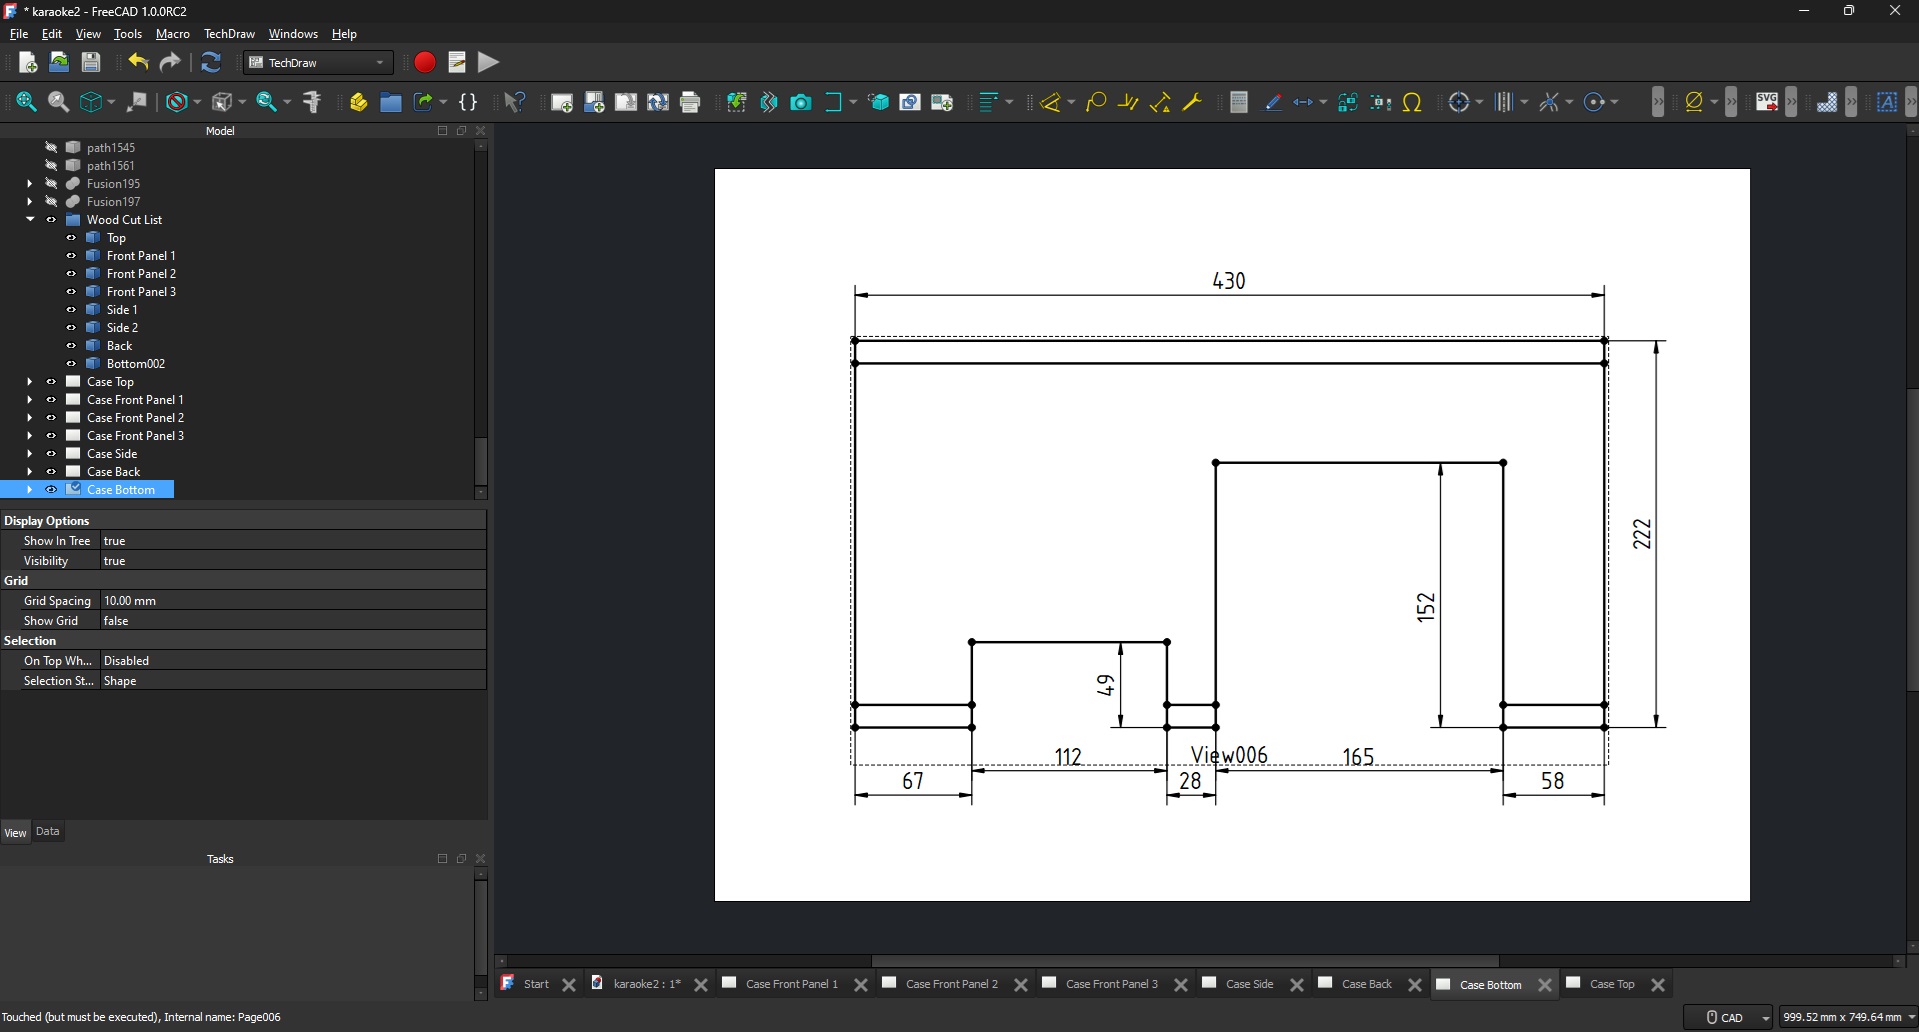
So long as your object is modeled, you can just create a new page in TechDraw, select your object, click the Insert View tool, then set up which angles you want a wireframe of the object printed onto the page, how you want it scaled, etc. Then you just use the Insert Dimension tool to click points and edges and it will stick nice clean measurements on everything you want. Hit print, and now you’ve got drafts to take to the garage for some woodworking.

I really had no idea FreeCAD had this, but now that I do know, I can’t imagine not using it.
Assembly
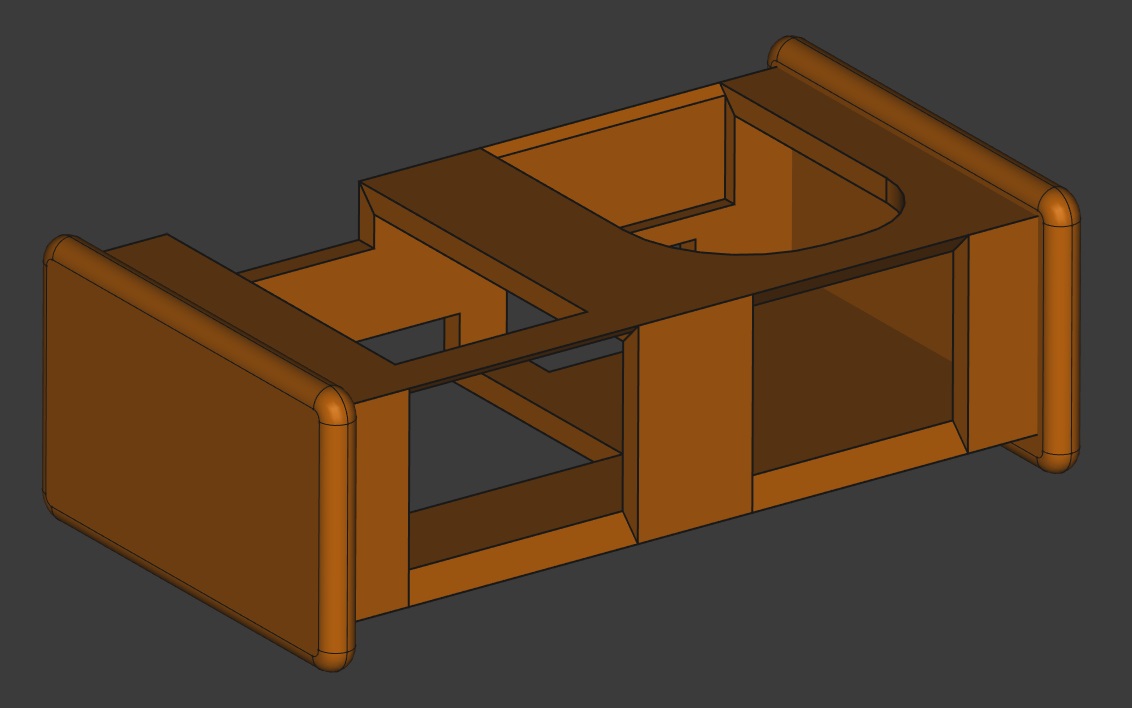
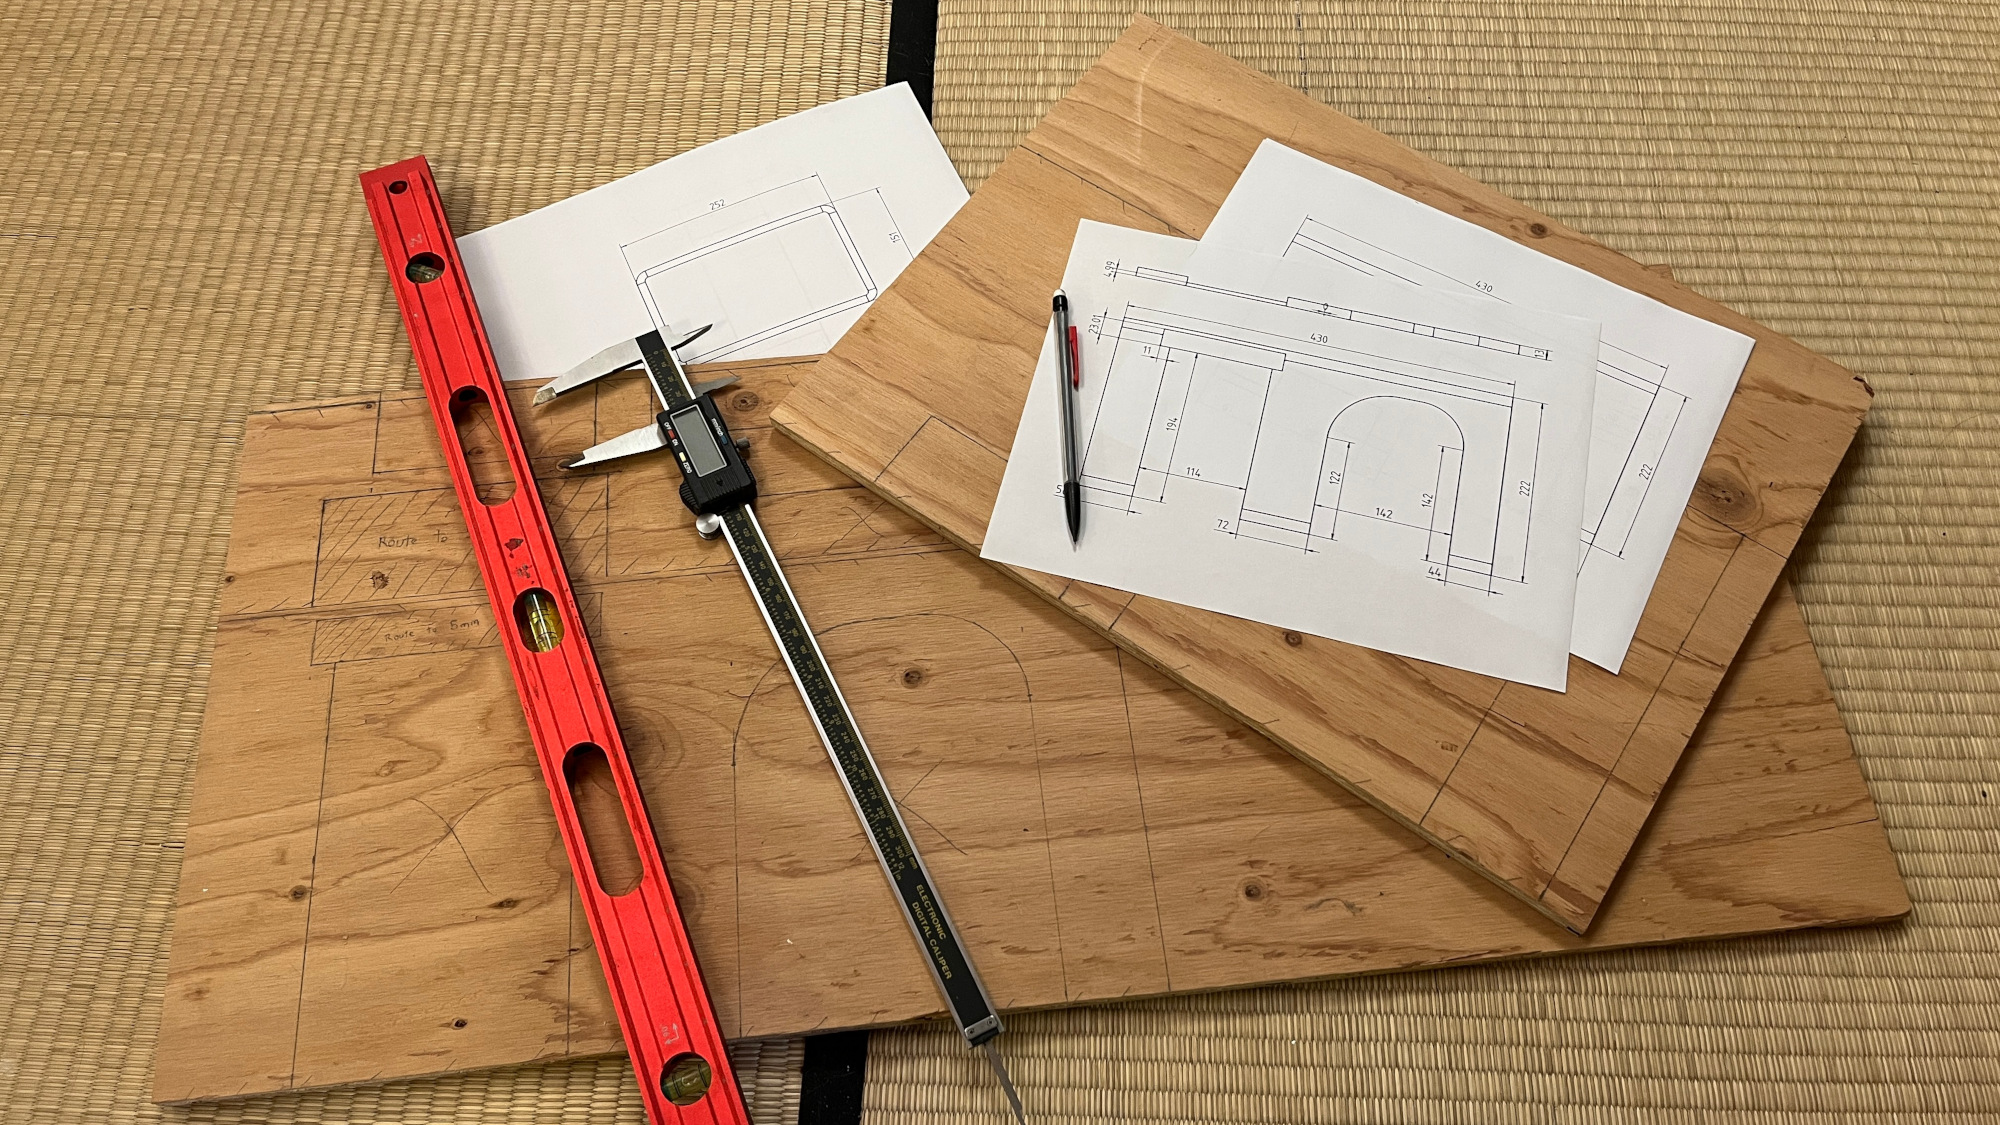
From here the process was just to arrange the pieces into a box, then stain and coat it and slot the printed panels into it. All of the circuit boards and components mount to the 3D printed components, then the printed components fit over the box and are attached with some screws. All that’s really important is that the box has cut-outs in the right places, and they’re small enough that the parts fully cover them.
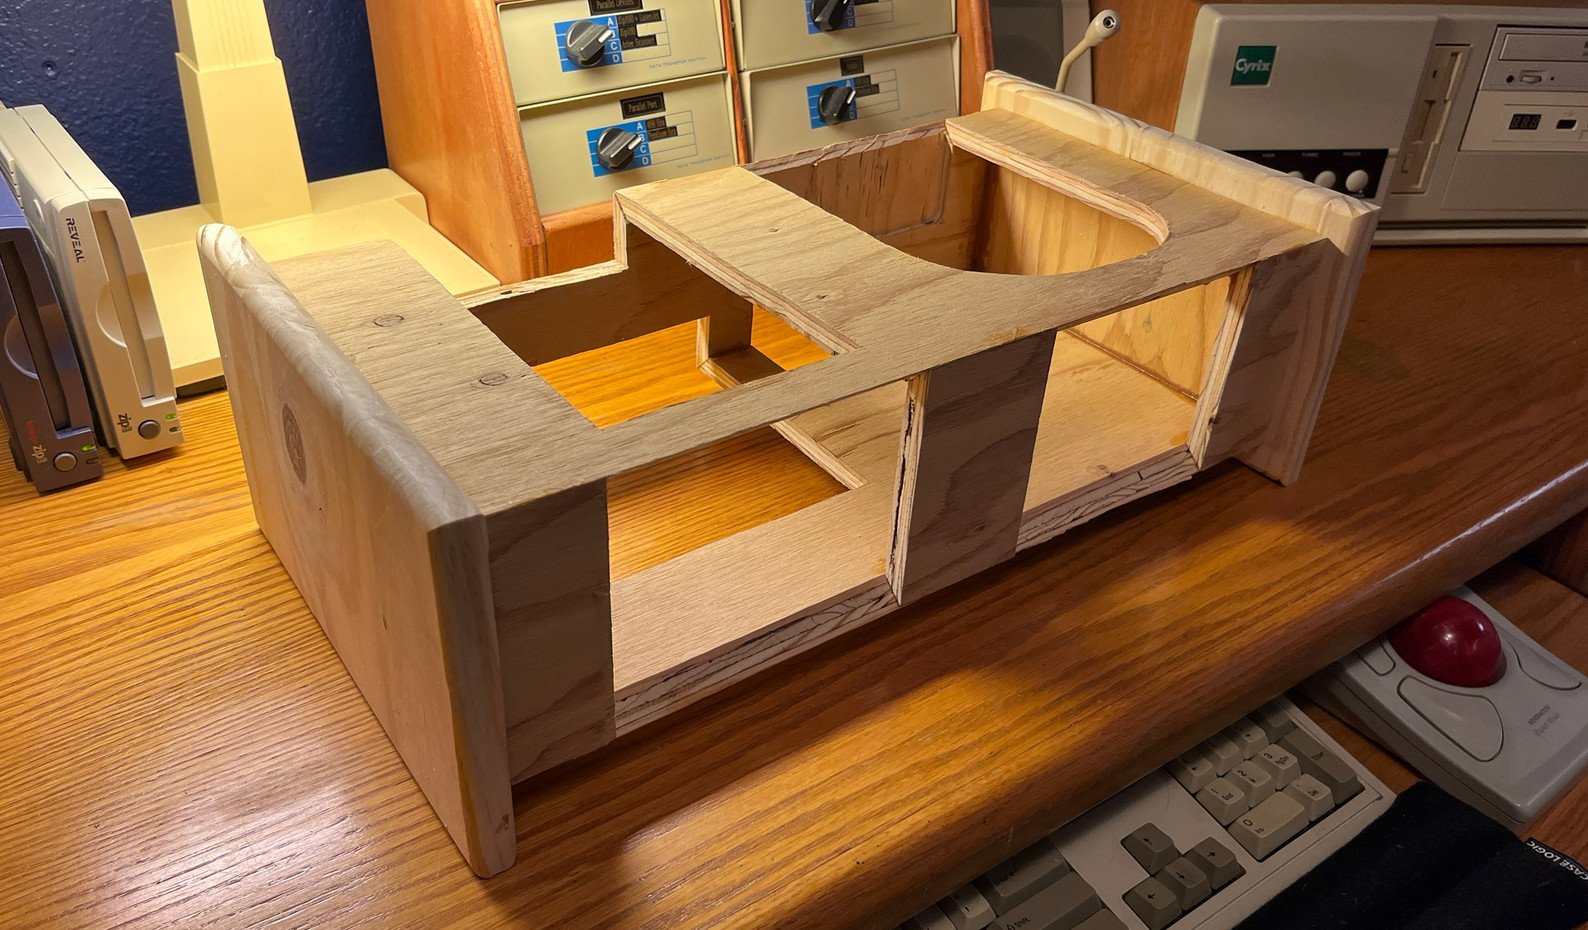
Thanks to TechDraw the box came out quite accurate to the digital model, so everything just slotted together as designed. A bit of minor freehand routing went into the openings for the screen and speaker when attaching those, but that was expected. I wasn’t yet sure when designing if I’d buy wood for the project or if I had enough scrap on hand, so I didn’t yet know how thick the panels would be. The sides are solid leftovers from a laundry room countertop project, and the rest is old plywood from a demoed kitchen soffit.
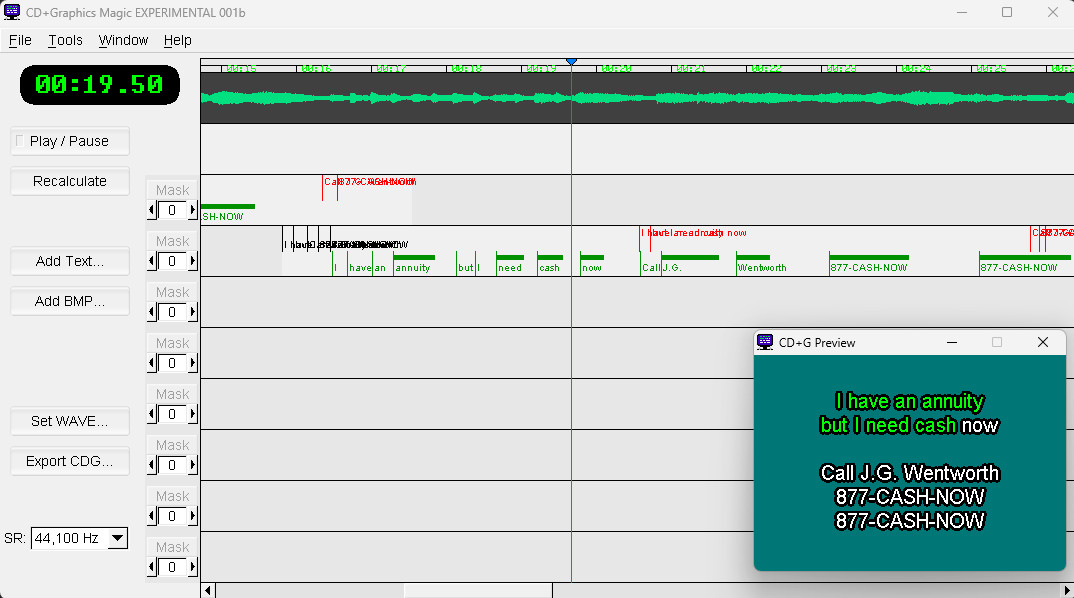
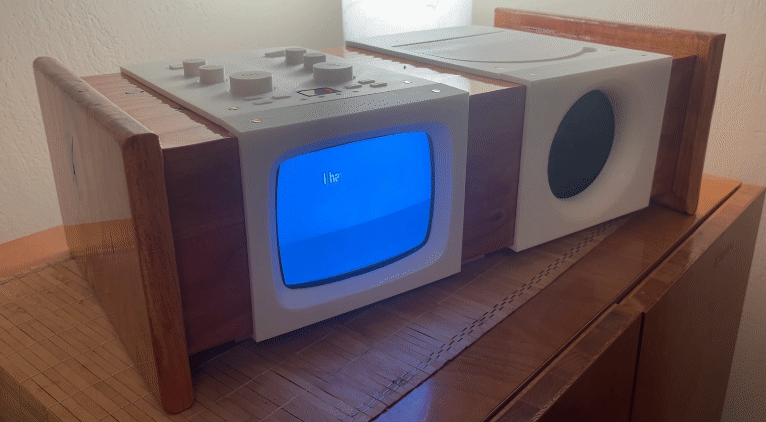
877-CASH-NOW
So now there’s an ultra-fancy, one-of-a-kind karaoke machine, but what to do with it? I can think of one thing. There’s a song out there that everyone knows the lyrics to, but has never been a karaoke track. Since CD+G is an old, well-documented format, that can be arranged!

Traditionally making DIY karaoke tracks has involved using phase cancellation tricks to isolate the instrumentals. Since the vocals are generally center-panned and largely identical between the left and right channels, the simplest form of this is to invert one channel and mix the track down to mono audio. The parts that mirror each other cancel out, and karaoke machines of this era are mono anyway. The drawback is this leaves the music sounding somewhat hollow and strange, and it doesn’t work well on all songs. It really doesn’t provide a satisfactory result on my crappy recording of the J.G. Wentworth commercial.
Instead, I used Demucs Music Source Separation, a local AI model specializing in separating drums, bass, and vocals from the rest of the accompaniment. Specifically, I used a version of it packaged for Docker that’s as simple as dropping an MP3 into a folder and running it, and separated files come out the other side ready for a little fine-tuning in Audacity. This worked fantastically and is one of those genuine use cases of AI where everyone can enjoy a paradigm shift in workflow ease, quality, and efficiency. You know, as opposed to its more common applications in mass surveillance and baiting C-suites into shooting themselves in the foot.
Adding the lyrics
To burn your own karaoke CD, you need to create a .cdg file. There are a number of ways to accomplish this, best covered by Josiah Winslow’s 2024 article “I made a CDG karaoke maker!” (I’m not the only person playing with CD+Gs in the 2020s!). Most of the software is either expensive, crusty, or expensive and crusty, but it gets the job done. I ended up trying a few but settling on CD+Graphics Magic. It’s extremely buggy, but you get used to it, and it’s free and simple to figure out. Be sure to check the readme for some essential modifier keys.
If you’re looking to make a lot of karaoke songs, Karaoke Builder Studio was actually quite impressive. It’s $99, but the level of graphical customization and number of animated transitions really set it apart. I did still manage to crash it once, but I can’t tell you how many times I crashed CD+Graphics Magic, so it’s all relative.
Burning the CD
Actually getting that song onto my little CRT ended up being a journey. On Windows there’s Power CD+G Burner 2 for $49, and the trial version took my .cdg and .mp3 file and burnt a working karaoke CD no problem. On Linux, though, oh my god. PacketFOG reported success with cdg2bin (part of cdgtools) and cdrdao with --driver generic-mmc-raw set, so I tried that after first revising cdg2bin for Python 3. I hardly ever use Python, so installing multiple versions on my machine scares me.
Result? Worked great as an audio CD, but no graphics on the CRT.
What followed was two days of trying to compare my cdg2bin outputs with rips from Power CD+G Burner in a hex editor, reading and rereading CD+G Revealed, pages of notes on arcane-sounding topics like Reed-Solomon codes and Galois fields, 4 custom C programs trying to analyze what on earth the people who made Power CD+G Burner knew that I didn’t, and causing poor Claude Opus to have a meltdown.
It ended up just being that --driver generic-mmc-raw flag on the cdrdao command. I changed it to --driver generic-mmc and it worked great. I blew 20+ hours of earnest effort to save $49. Linux, baby! Have a git repo!
High quality nonsense
So anyway, there’s three weeks of my life! Managed to fit thrifting, vintage tech, electronics repair, drafting, 3D printing, woodworking, AI, programming, Linux, and artistic pursuits all in one project! Came out pretty good I think.
All that said, I’ve never once sung karaoke in my life. Suppose it’s time to develop an interest in it!